Alright friends, I know you want the meat of the muslining issue, and today you are going to get it! WARNING: this is a mighty post! Do not read 3 minutes before bedtime. You will get too excited about all you are learning about muslining and shirt-making and be totally unable to fall asleep. Get a cup of coffee or tea, send the kids outside to play for an hour or so, and digest this wisdom. Oh. In case you missed Part 1 of the muslin story, do take a minute to glance over David’s initial thoughts on when/if to muslin.
David: it’s all you, baby.

OK, today let’s get down to some specifics for muslin (or non-muslin) fittings on two very different body shapes:
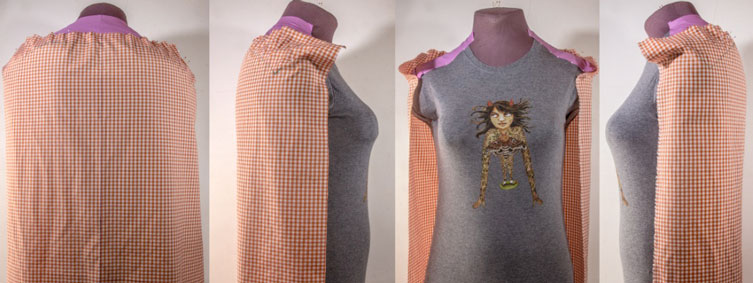
First I check through what I know about the specific case I’m facing. In this first example, I’m working on my female display form, which is presumably designed to make clothes look good, but is a pretty unlikely shape (dare I say…Barbie Doll!?), so it makes for a good example in back of a shape that might need only slight tweaking in the fashion fabric (FF), but in front and elsewhere will be more challenging. It’s got wide shoulders and a flat “good-posture” back, but a thickish neck and extremely narrow waist and no hips to speak of. So I choose to be bold and cut out in FF all around, but might have decided to cut just the front in muslin, we’ll see…
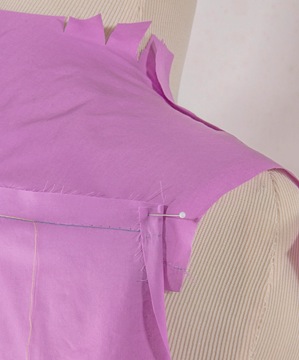
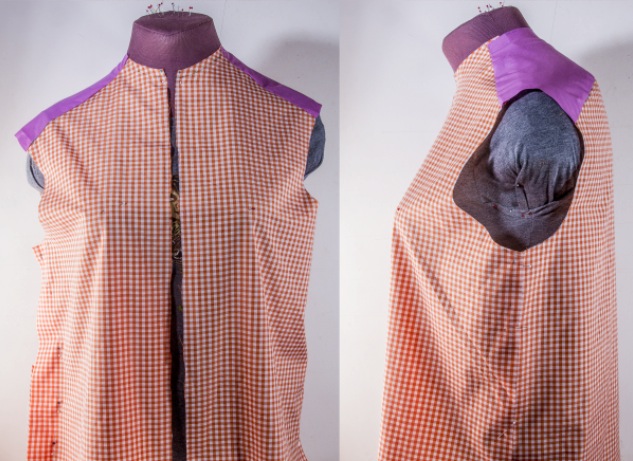
I start by basting the CFs and side seams right sides together, but overlap the seams going into the yoke, with the yoke underneath and the front and back on top (recall from Part 1 that I basted closed the CFs for the test), all as shown below. Note also that I pinned the fronts to the yoke, but basted in back, leaving a few inches at each armhole unstitched for easy adjusting, confident that this would be the most likely and most logical place to make any adjustments.
Pix 1-3 in this collage are BEFORE, showing the unmodified Archer, sized by bust circumference, on Barbie with no adjusting. The yoke fits nicely as expected, but there are dramatic saggings and drag lines everywhere below, and the front seems quite a bit too wide overall. The armhole is pulled forward out of shape by the undarted bust.

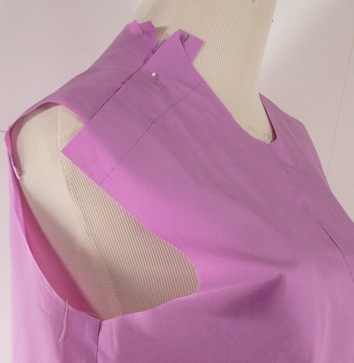
Pix 4-6 are AFTER adjusting as described below.
I start in back (pix 4 in collage), by simply lifting the ends higher at each armhole, pulling up on the back seam allowance so it overlaps the yoke more deeply…
…which very easily smooths out the back drape as seen from both the back and the side (image # 5 in the collage shot above), altho that also exaggerates the deformation of the armhole in front (pix # 5 in collage).
To deal with the excess width at the center-front, I first try to spread it out to the sides, which mis-aligns the armhole seams at yoke and front and exaggerates both the need for a bust dart and the overall bagginess of the body fit:
 Â
Â
I consider also raising the entire front at the sides to bring the neckline closer to where it should be, but this is beginning to seem like way too extreme a response, plus it’d be trashing the armhole which I’d rather not change any more than I have to. So, instead I decide to fold out the excess at the center front, bringing everything in more closely, and like this better all over.
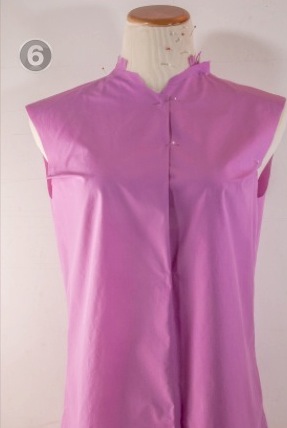
Plus it greatly reduces the size of the dart needed to smooth out both the armhole and the side seam/side front, which also means less dramatic distortion if I choose to leave out the dart, which I might well decide to do, since this is my fashion fabric and I’m loath to cut another front. Here is when it occurs to me that I might have been wiser to cut just this troublesome front out of muslin, leaving the back and yoke in the FF, so I could feel less restrained in my explorations; no need to be all “either/or” about that… But I can make this work, too, since all my changes will make the pieces smaller, which I can manage by trimming.

My chosen solution to the too-wide front means I’ll have to draw and cut a better neckline, but that’s easy and expected anyway, and overall, the fit may not be as shirt-like as intended by the original design, but it’s still got a lot of body ease, and now that I notice, those shoulders seem to fit the supposedly over-wide yoke almost exactly, so maybe that’s telling me that drooping shoulders aren’t really going to suit this shape anyway… The armhole has gotten slightly smaller, so I’ll either cut a smaller sleeve using the new armhole seam-line length, or slightly redraw it to return it to the length specified on the original pattern pieces. That decision would be directed by how all these changes felt to the actual person all this would be done upon in-real-life.
(Which raises the question: Could you do this on yourself? Well, probably sort of, by necessity; we solitary sewers are often called upon to deal with the really awkward… But obviously, a not-too-clueless or at least trainable helping hand would be great. My best advice: Make a body-double fitting form!)
Also note that what I’m choosing to do with my muslins is to correct them by draping in place, on the wearer or their stand-in, rather than to mark them up and then try to respond to the markings with flat-pattern techniques when the muslin’s off and back on the table. That’s what makes sense to me (while the other really doesn’t), but it’s just one of many ways to proceed. I like this draping approach since it’s all visual and immediate, no measuring, and the working goals are so easily perceived (and explained if that’s necessary): Lift or shift edges until the piece is smooth and falling parallel to the grain (as a rule); find the place where the smoothness needs as few pins as possible to stay smooth (I.e., it just sits naturally where placed with little or no strain or shifting back as excess pins are removed); do your best to minimize deforming adjacent pieces as you fix the one you’re moving; and with shirts especially, work towards reducing those darts, if you can’t eliminate them.
OK, next I’ll move a little closer to the real world by trying all this out again on my own quite asymmetrical body form, with the added degree of difficulty a full bust provides courtesy of a borrowed elastic sports bra stuffed with socks. In other words, a shape that KNOWS it needs a muslin.
It makes for a good example from all directions of a shape that needs to be altered for. It’s got quite wide shoulders for a “female” but quite within a normal range for big, tall women, and a very rounded “bad-posture” back, a thickish neck and little shaping below the bust. The shoulder shapes are so non-uniform and non-symmetrical that here I choose not to cut out pattern shapes at all for the front and back, but to call upon my method for custom shirt draping as described in Shirtmaking, my book on making dress shirts.
The idea is to start with only the yoke from the fashion pattern at the desired size, which can be cut from FF, since it’s usually not going to be altered. Instead, unshaped back and front pieces NOT cut from FF (Yay! Muslin at last:) will be arranged over the yoke to fall as smoothly as possible without redrafting the yoke, using its edges as guides for drawing in the front and back seams, as shown a few pix down. The yoke will be arranged as smoothly and in as balanced a way as possible on the body, which should be wearing a snug t-shirt to allow for pinning without creating any excess bulk under the “muslin”, as shown here:

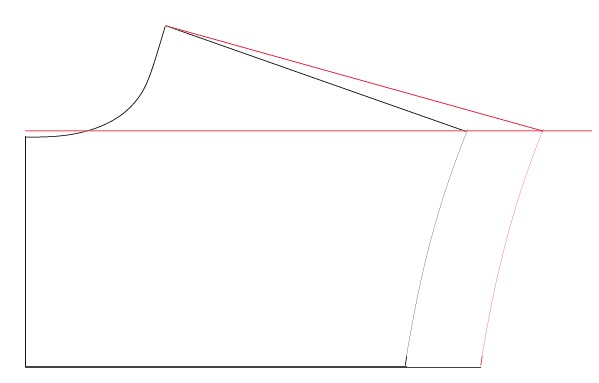
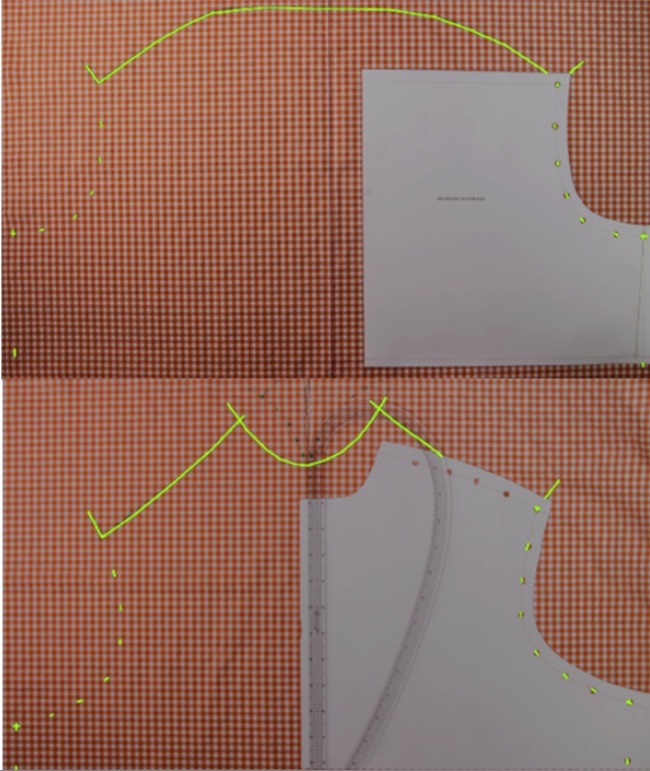
I started by measuring a comfortable shirt as described earlier, ang here I paid special attention to the shoulder or yoke measurement, since this is where I’ll start the fitting, and chose a garment which provides an extended shoulder somewhat in keeping with what I take to be the intention of the original design. It turns out the largest Archer size provides plenty of matching circumference around the body, but nowhere near enough width at the yoke to create any excess width for this body, which I expect will be needed to accommodate the bust without darts. So, my first step is to extend the yoke pattern to match the comfortable garment, without changing the yoke portion of the overall armhole length, like so:
I press under the yoke seam allowances at the front and back edges so they’ll be easier to feel through the draped fabric I’ll adjust on top of them, placing pins just at these edges, too, for the same reason.
For the draping steps up next, I cut two rectangles large enough to go well beyond the sides and shoulders of the body, marking the CF and CB clearly. Note that I’ve chosen a woven gingham to make it easy to see the fabric grain while manipulating it. I prefer a small, minimally distracting pattern rather than bigger checks and stronger color contrast, and don’t require an all-cotton fabric as I would typically prefer for most other muslin operations, as these pieces won’t be pressed or involved in much actual sewing. So long as it drapes and handles in a shirting-like way, I’m good to go.
Draping the back is very simple. I match the centers, then smooth the gingham up over the yoke below trying to keep any distortions as it molds to the rounded back pushed above the edge of the yoke, which will be trimmed back to the width of the yoke/back seam allowances. To have this work out as intended, it’s critical that the yoke’s back edge falls at or near the crown or break-point of the roundedness, in other words, at an ideal location along the entire back for placing a shaping seam to accommodate the specific roundness you’re dealing with. If the yoke’s lower edge is too high, the distortions from the curvature will appear on the back piece; too low and they’ll form on the yoke. Happily, the Archer’s yoke is just right:)
Note that to mark the back drape when all is placed so that the back falls smoothly, I’ve simply traced along the yoke edge, feeling it through the gingham and been careful to show exactly where the yoke ends are at the armhole. Back done!
In front, the only difference is that I first cut into the upper edge of the gingham along the CF marking for a few inches to allow an opening to form around the neck when the rectangle is placed up against the body high enough to cover the entire front of the yoke. With the rectangle draped and loosely pinned over the shoulders I first establish the neckline, using a paper strip “collar” to guide my marker, then trace along the folded front edges of the yoke to transfer these to the front piece again carefully establishing the yoke ends at the armholes, as shown below.
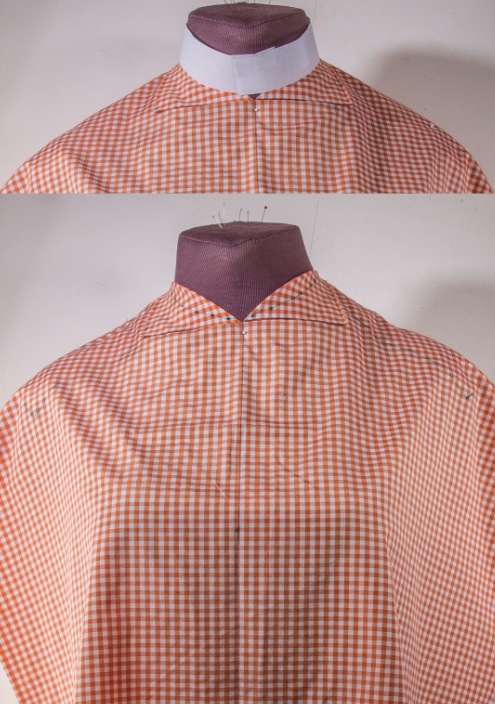
Next, here’s how I transfer the exact shape of the pattern’s front and back armholes to the draped ginghams off the form, using the fabric grain and the yoke-end markings to guide and orient the pattern pieces to the fabric. Front, neckline and armholes done!
Now I can at last convert all this draping into something very like the test garment I used in the first example, by trimming seam allowances into the gingham rectangles along the markings and stitching them to the yoke, then pinning the sides together, like so:
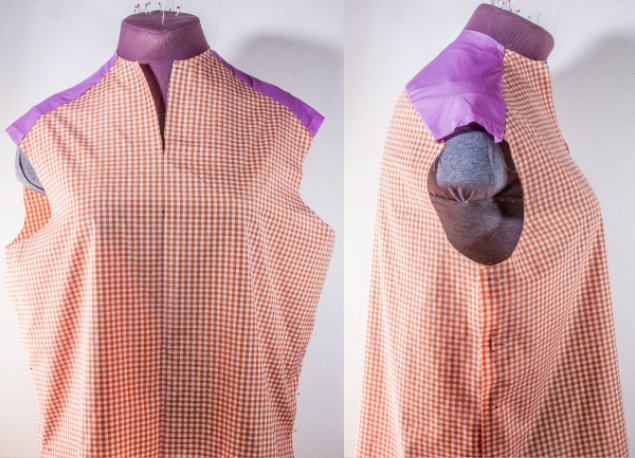
Not too bad, altho I see right away that my neckline still needs work, and the overall circumference is quite vast, not too surprising considering how I expanded the yoke. OTOH, the dartless armhole looks pretty great…but, hmmm, look how the grain is tilting forward in front below the bust as seen from the side.
OK, some fixing options, treating each side differently, left-hand image below. Most obviously, I’ve slashed the CF all the way down, that being the simplest way to relax the neckline; I’ll add half the spread to each CF on the pattern pieces. On the picture’s left side I’ve repinned the side seam to taper it in below the bust and at the waist while keeping the armhole unchanged, noting that so long as I keep the tapering identical on front and back, the sides remain smooth, but also that a small dartish fold begins to appear at the armhole, and that there’s a strain line coming off the extended shoulder towards the bust. On the other side (the picture’s right), I’ve completely removed the yoke extension so carefully added at the start, to see if it’s really needed on this shape. I took the muslin off the form to do this of course, but used the same method to shift the armholes from the pattern as I added them before, simply sliding the patterns inward but still on grain in relation to the gingham (altho note that I COULD have pivoted the armholes inward or outward from the yoke end points to accommodate a more dramatic difference between the shoulder and the circumference below if that had seemed warranted). The armhole is thus only slightly changed in overall length and not at all in contour. I’m delighted to see that the armhole remains very little distorted. Perhaps the best solution will be to merge these two ideas, reducing the yoke and shaping the side seams, easily done, and still leaving me with a usable FF yoke piece. I don’t think I’ll even bother to test the sleeves…
So, muslin done!
Well, THAT took more time and space than I intended, so I think I’ll just go eat something and fall senseless to the couch so I can be refreshed enough some other day to finish up with sources, tips, whichevers and whatevers, and the questions no doubt springing to the mind of any readers who’ve made it this far with me. Please don’t hesitate to ask! Thank you and a very good night to all.
Thank YOU, David, for sharing so much of your vast shirt-making experience with us. And you get all the space on this blog you need or would like. 🙂
Happy sewing!
Maris