Ohhh readers, you are in for a very, very special treat today. The incredibly generous, kind, self-made expert-of-all-things-shirts, David Page Coffin, is going to share a sampling of his wisdom on making a fitting muslin. Or not! This post covers WHY you might even be interested in making a muslin at all, and in a subsequent post he will cover a bit of the how-to-do-it stuff. Enough of me, and now for the real deal. Take it away, David!
So, do I HAVE to make a muslin first for this new Archer pattern I’ve got?
Here’s how I see it:
NO, you don’t have to, if:
- you’re quite happy with the way most of the ready-to-wear shirts you’ve bought fit and feel, or
- you have even one shirt that feels really just right, or
- you’ve made lots of other tops that fit perfectly well with no alteration—or with the fixes you’ve learned to always make so your top patterns work out better, or
- you’ve tried on your friend’s Archer and it looks great on you
If any of these are you, and you’re still reading, what I’d do in your shoes is get out that best, most favorite shirt or altered-as-usual pattern and measure it in the following places:
- the shoulders from armhole to armhole just below the back neckline
- across front and back just below the armhole
- at the waist or hip if your shirt happens to get wider as it moves down towards waist or hip
Then I’d pick the Archer size(s) that best match these measurements using the Finished Garment Measurements chart from the Archer booklet, and just dive right in.
And for all you folks who know you’re going to make a muslin anyway, I’d strongly suggest you do the same thing with your favorite shirt, even if you think its fit could be improved upon. In other words, at the very least, you should know how your Archer is going to compare to something you already know well, and don’t choose a cutting-out size for it that’s smaller than what you know without some careful thought. It’s easy to adjust for smaller, but not for bigger!
You’ll note that I mention measuring the shoulders, even though there’s no shoulder measurement included in the chart (very few patterns do include this, unfortunately). I measured all the Archer yoke patterns from CB to the shoulder notch, subtracted the seam allowance, then doubled; here’s what I found:
0=15½”  2=15¾”   4=16″   6=16¼”   8=16½”   10=16¾”   12=17″   14=17½”   16=18″   18=18½”
If you’re an A or B cup, (or you already know you’re going to add front darts or do some other FBA, because you always need one) you could skip measuring the shoulders. But if you’re a C cup or bigger and you want to see if you can get away without adding darts to this pattern (especially if your favorite shirt is also without front darts), or if you’ve got noticeably wide or narrow shoulders, I recommend measuring your comfortable garment’s shoulders. You may choose to ignore this factor in your initial size choice, but here’s why I think it might be a good idea to at least be aware of it:
Comparing the Archer front to a bunch of other (all Big-4) women’s shirt patterns at the same size I saw a strikingly wider shoulder and bigger overall circumference than typical:
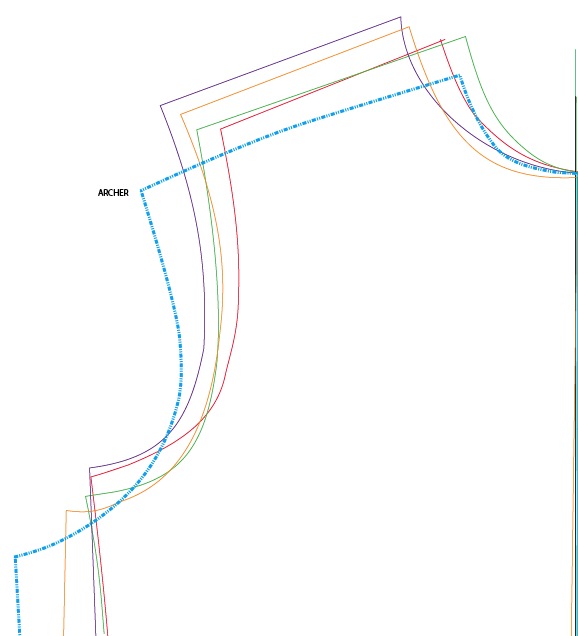
…which I interpret as a deliberate strategy for reducing the need for a front dart, very much the way a big-shouldered man’s shirt often does when worn by a woman. It’s not just the bigger circumference that does that trick, the widened shoulder is critical as well; you could think of it as containing an unstitched shoulder dart. It seems very likely to me that this feature of the Archer draft is a large part of why it’s so popular, so, whether or not you need or want to apply your shirt’s shoulder measurement to your size choice for the Archer pattern, it’ll be a good thing to know about, and perhaps to adjust as an option further along if something’s not working as well as you’d hoped.
OK, back to diving right in for the no-muslin folks:
Before cutting out the collars, collar stand, cuffs, and sleeves, I would cut out ONLY the fronts, backs and yoke from the fashion fabric (FF), making the neckline a little bit smaller on the yoke and fronts so I’ve got more wiggle room to adjust this, and then pin or baste up the body for a test try-on. I’d just baste the center fronts together at this stage, rather than finishing the bands on these edges, but you could do that now if you’re confident. Then I’d confirm the neckline is to my liking or adjust it, measuring it to re-establish the length of the collar pieces needed if changed, and measuring down from the yoke’s armhole seams to nail the sleeve length I wanted, given the Archer yoke I’d settled on. I WOULD probably pin on muslin versions of those pockets at this stage…
IMPORTANT CENTER FRONT NOTE: If you’ve bought the pattern recently and it has separate and different right and left front pattern pieces (unlike earlier versions which only have one front piece), the CF on the right side is also the cutting line. So, to baste your fronts at CF for this FF try-on, you’ll need to add a temporary extra 1/2 inch SA on the right front piece, if you’re going to put off doing the bands ’til after tweaking the neckline.
In fact, I’d go further at this stage and see if some fine-tuning at the yoke and side seams could improve the shoulder and body fit. If I was smart enough to remember, I’d probably even cut out the fronts and back with 1-inch seam allowances at the sides and yoke to facilitate this. I’d do this tuning-up just like I would in muslin, as I’ll describe next time.
And NO, I wouldn’t make a muslin, if any of the above is true, but I still wanted to try out any of the construction steps coming up that were new to me or seemed challenging. I’d just make samples of those details, ideally in my fashion fabric and selected interfacing if I had enough of it, especially if it was the collar or cuffs I wanted to practice on. No way would I want my final collar in my perfect fabric to be a first-time venture!
MAYBE I’d make a muslin, if I was trying out some quite non-typical, or very new to me fabric and had some concerns about how it would work…but it’s hard to imagine just what that non-typical Archer-suitable fabric would be…so, nah; I’d probably still only do a few sample seams and details just to loosen up and feel better prepared, especially since this would actually need to be a test garment in the fashion fabric if I was doing it right, not really a muslin at all, and I can’t recall ever being able, let alone willing, to do that.
Definitely YES, I’d make that muslin, if I was in any way not happy with how RTW shirts or all my previous DIY shirt projects have always fit!
But just as described above for tweaking the cut-out FF, I would NOT simply cut out everything and make up a sample garment with collar, cuffs, pockets and sleeves all in place. In other words, I’m not trying to see if maybe, against all odds, THIS pattern will magically fix all the shirt fitting problems I’ve always had before, no matter how many rave reviews it’s gotten. I’d want to have maximum opportunity to fix things I can be pretty certain will need fixing before moving on to other things! So, my muslin, too, would include only a yoke, neckline and body, with muslin sleeves cut and tried on only after those were tweaked, if at all, which may not be necessary if your arms have never before caused you to alter a shirt-sleeve pattern. You might however want to check how they fall from an altered or redrawn armhole.
So I hope this helps you make a good decision about the eternal question To Muslin, or Not To Muslin. In my next post I’ll show you how I’d work an Archer-fitting on 2 very different body shapes.
Wowsers! Thank you David, for such a thorough analysis of why we might want want to muslin the Archer pattern specifically, as well as some great measuring tips that can be applied in all fitting/muslining decisions for any garment.
Happy sewing!
Maris