• Facebook
  • Instagram
  • RSS
  • Twitter
  • Skip to primary navigation
  • Skip to main content
  • Skip to primary sidebar
Sew Maris
  • Home
  • Classes
  • Tutorials
  • About
  • Contact
  • Shop
  • Blog

Tutorials

Tutorial: Invisible Zipper

If you have never tried installing an invisible zipper in a garment, you might be just a wee bit intimidated.

But honestly, I think they are easier to put in than regular zippers, and they definitely elevate the “ready to wear” (RTW) look of your garments.

Invisible zips are best for garments made of light to medium-weight fabric, and should be placed into a garment seam. Nothing exposed for these babies. 😉 Because the “teeth” on invisible zips roll to the under side of your garment, once installed they really are invisible except for the small zipper pull. The zipper teeth are also a bit smaller than those on a “regular” polyester coil or metal zipper, so invisible zips are not commonly used in heavy weight fabrics or in situations that require constant opening and closing. Be sure to buy a zipper that is longer than your opening. You will not be able to stitch beyond the zipper pull, so extra length is extra insurance, and any excess is easy enough to cut off.

I like to put invisible zips into a “flat” or completely open seam, instead of partially sewing up the seam like you would do with a centered, “regular” style zipper. I also think an invisible zipper foot for your specific sewing machine model is definitely worth the investment; truly, it will make the job So.Much.Easier. Although, you rarely have to encourage me to buy specialty machine feet. The “special” engineering that enables them to perfectly perform their function makes these feet worth every penny, IMHO.

Invisible zipper tutorial by Sew Maris

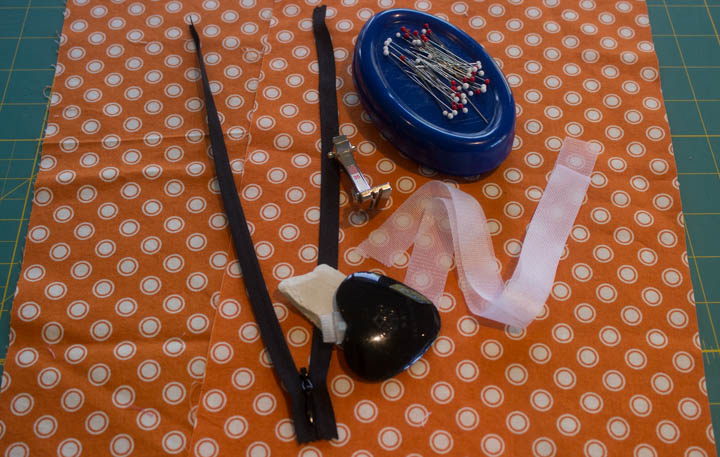
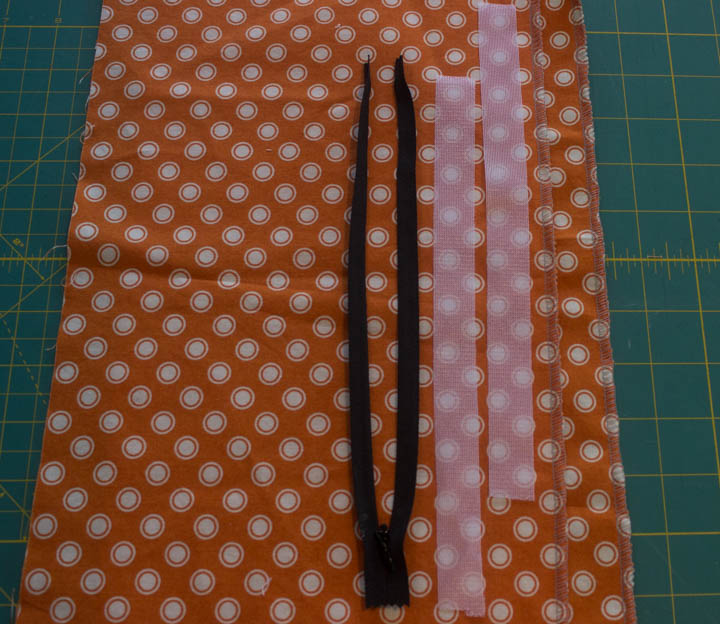
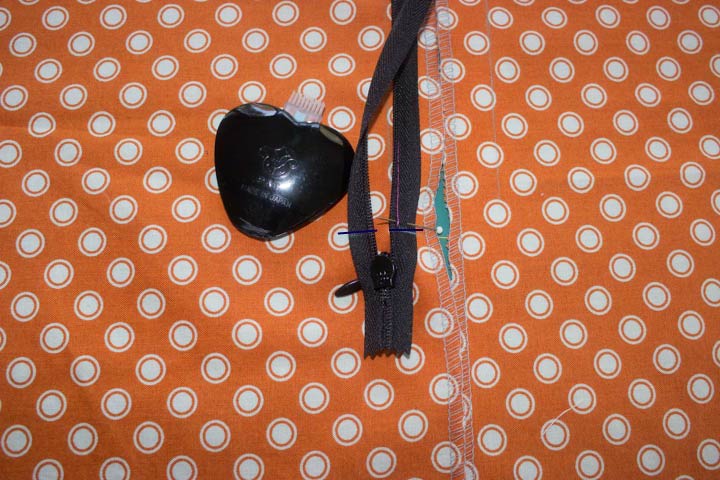
So, here are a few tools/supplies that will make the invisible zipper installation job a bit easier. Of course, you will need a sewing machine + basic sewing supplies + an invisible zipper. Duh! 🙂
1. Invisible zipper foot, or (less desirable) a regular zipper foot
2. Fabric marker or chalk marker
3. Interfacing strips

Step 1. Preparing the seam allowance

Invisible zipper tutorial by Sew Maris

Finish the edges of your garment in whatever manner you choose. In my sample, I have serged the edges.
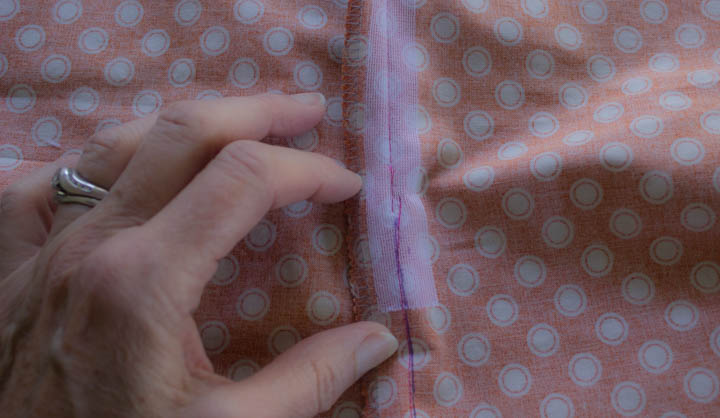
Step 2. Stabilizing

Invisible zipper tutorial by Sew Maris

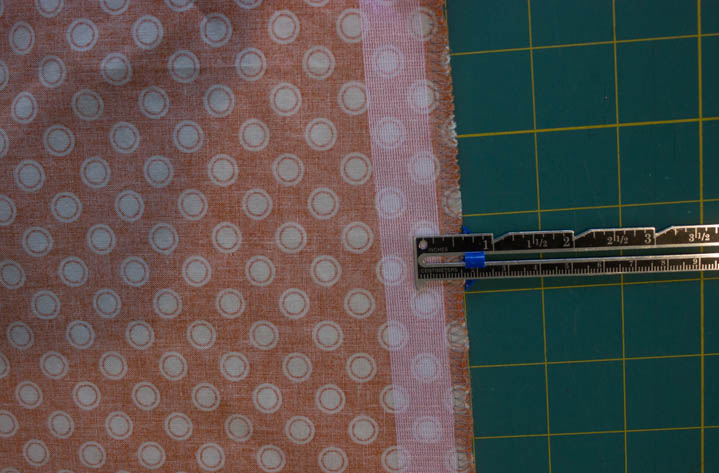
Stabilize the stitching line. I keep strips of fusible interfacing handy just for this purpose. I usually cut the strips about ¾ of an inch wide on the straight grain. Make sure to fuse the interfacing over the stitching line for the full length of the zipper. In my sample, the stitching line will be 5/8 of an inch from the fabric edge, so the interfacing completely covers that area of the fabric.

Step 3. Marking

Invisible Zipper Tutorial by Sew Maris

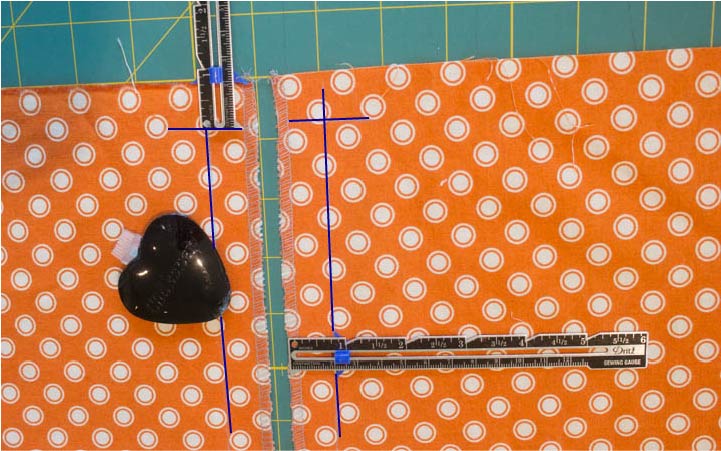
Draw a vertical line on the right side (RS) of your garment that is 1/8 of an inch more than the seam allowance for your garment. In my sample, the seam allowance is 5/8 of an inch, so I drew a line ¾ of an inch from the fabric edge (5/8 + 1/8 = 6/8 = ¾). Do this on both sides of your garment fabric.

This “extra” 1/8 of an inch is to allow the invisible zipper teeth to “unroll” while you are stitching the zipper to the fabric.

Also draw a horizontal line 1/8 or ¼ of an inch + your seam allowance from the top edge of both sides of the  garment.

Note: Exactly where you draw this horizontal line depends on how the top edge of your garment is to be finished. If you are adding a waistband, allow only a small amount more than your seam allowance. If you will be facing the top edge and adding a hook and eye closure, add about ¼ of an inch to allow for the “turn of cloth” plus the hook and eye.

Step 4. Pinning

PinnedZipLines


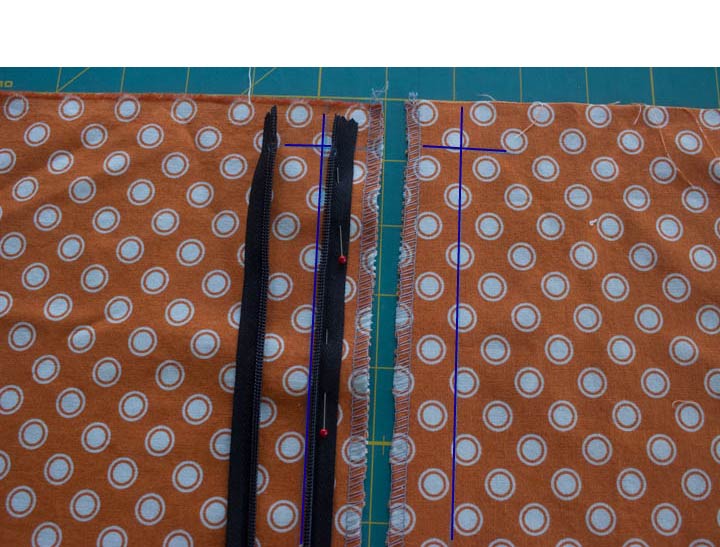
Lay the open (unzipped!) zipper RS down onto the RS of your fabric, aligning the edge of the zipper teeth with the vertical line and the zipper stop with the horizontal line you drew on the fabric. Pin or baste the zipper to the fabric.

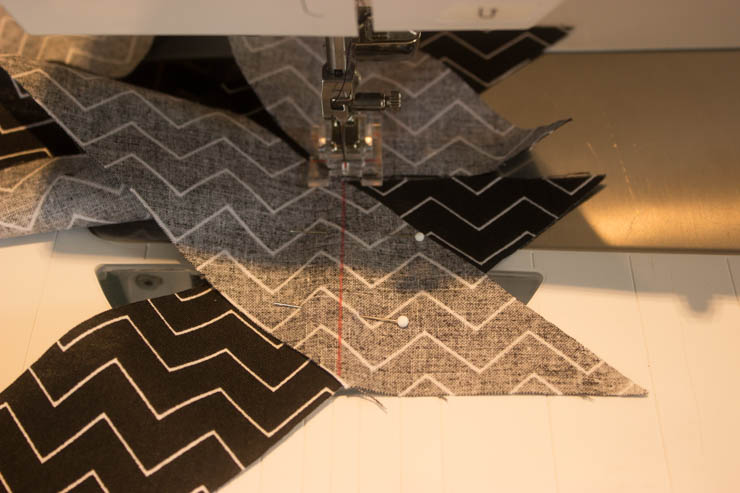
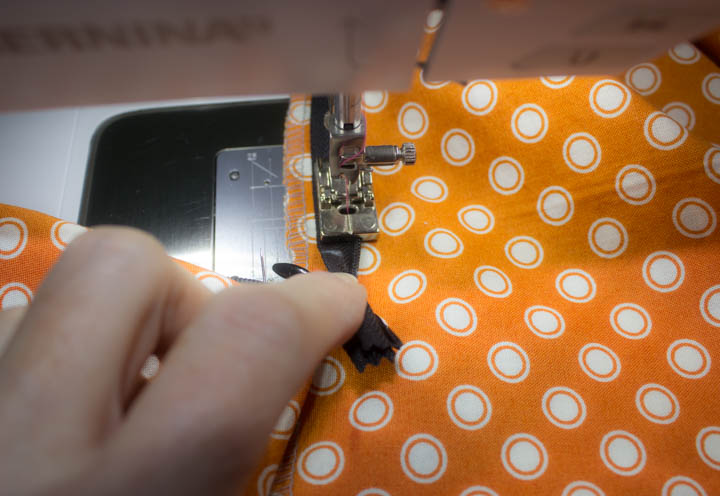
Step 5. First side stitching

Invisible zipper tutorial by Sew Maris

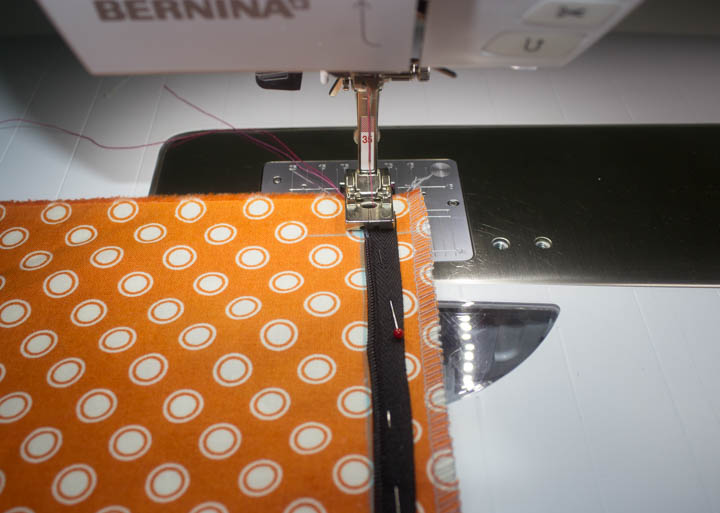
Starting at the top edge of the zipper (above the zipper stop), stitch the  first side with a 2.5 or 3.0 straight stitch length. It doesn’t matter which side you stitch first, but since I started on the left side, I am using the left-most side of the invisible zipper foot.

Invisible zipper tutorial by Sew Maris

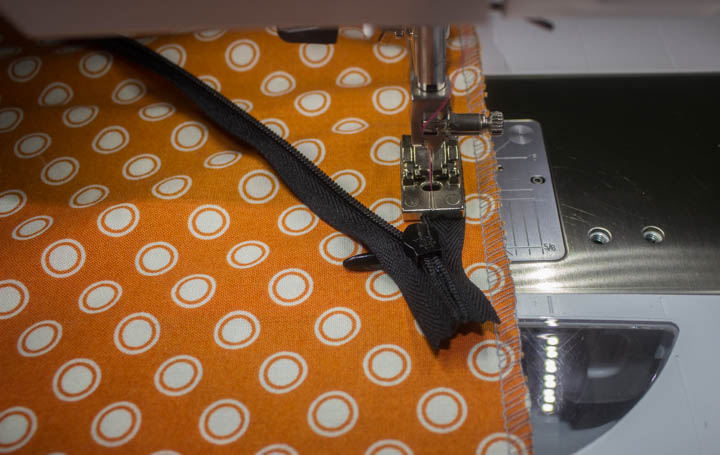
Stitch down as far as you can, or to the marked “zipper stop) point on your garment. To secure the bottom of the zipper edge, you can backstitch for a few stitches, or shorten your stitch length when you are about ½ inch away from the bottom of the zipper.

Note: You can see that it is impossible to stitch beyond the bottom end of an invisible zipper because of the pull size/placement, so using a “too long” zipper is always better than one that is too short. Just stitch as far as possible, or to your marked zipper stop.

Step 6. Second side stitching

Invisible Zipper Tutorial by Sew Maris

Draw a chalk line across the bottom of the zipper where you ended the first stitching line. This chalk line allows you to stop the stitching on the second side of the zipper in exactly the same place as the first side.

Invisible zipper tutorial by Sew Maris

Then just repeat steps 4 and 5 for the second side of the zipper, placing the other side of the zipper on the second side of the fabric. Be sure to stop stitching right on the chalk mark!

Step 7. Garment seam closure

Invisible zipper tutorial by Sew Maris

Using a regular zipper foot, stitch the remainder of the garment. seam closed. I find it easier to draw the stitching line on the garment first, since I am using a regular zipper foot and have adjusted the needle position accordingly. Be sure to stop your stitching at the same spot as the bottom edge of your zipper stitching, and either backstitch or reduce your stitch length near the end of the seam to secure the stitching.
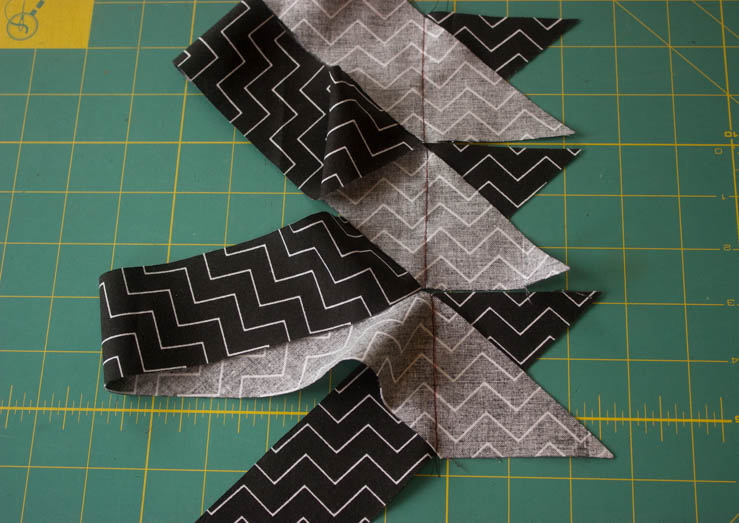
Step 8. Press

Invisible zipper tutorial by Sew Maris

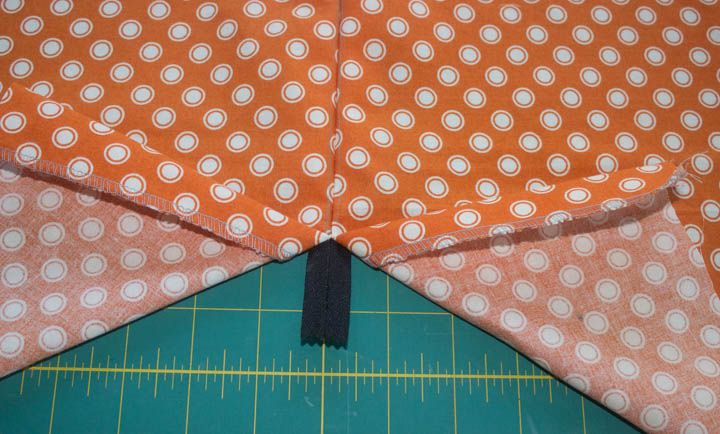
Press your garment! A good press and shot of steam if appropriate for your fabric makes a world of difference in the finished look. Don’t skip this step! Look how perfectly the bottom edges line up!

A few other options….

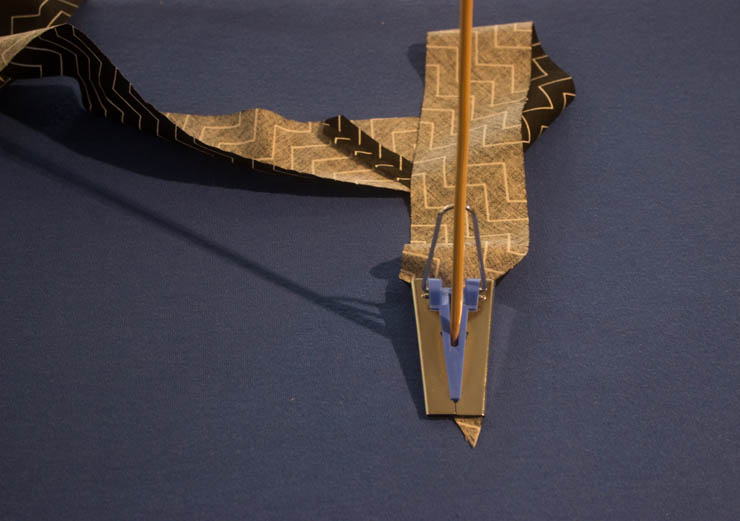
  1. If you want a more finished look on the end of your zipper, you can wrap the end of the zipper tape with matching or contrasting fabric. This is an especially good idea if you have cut off some of the zipper length.
  2. Try securing the zipper tape to the seam allowance only, either for part or the entire length of the zipper. This provides additional security, and also keeps the zipper tape from “flapping” in the seam allowance during wearing.
  3. If you do not have an invisible zipper foot for your sewing machine, it is perfectly possible to install an invisible zipper with a standard zipper foot. You may to practice just a bit to get the stitching in the correct place so the tape doesn’t show from the outside and making sure the zipper will still “zip up!”

Do you prefer invisible, or regular zippers? Which do you think are easiest to install?

Happy sewing!
Maris


Tutorial: Quick-to-make Wooly Lamb Christmas Ornament

It’s December, so it is totally OK to start talking, thinking, planning and making for the holidays! My family celebrates Christmas, so the project I am going to show you how to make today is designed for a Christmas tree. So when Deanna McCool asked me to participate in her 12 Days of Christmas Blog Tour, this project jumped immediately to top of mind. But it is so cute I think it would also make a darling package topper for lots of different holidays or gift-giving occasions.

Christmas Wooly Lamb Ornament by Sew Maris

Supplies needed:

  1. Black felt
  2. White “wooly lamb” fake fur
  3. Narrow red ribbon
  4. Small bell
  5. Stuffing
  6. Gold metallic thread (optional)

Pattern: PDF download for lamb body and face

Christmas Wooly Lamb Ornament by Sew Maris

1. Using the PDF pattern download, cut 2 lamb bodies from the fake fur. Also cut 1 lamb face and 4 legs (approximately 2 inches x 1/4 inch) from the black felt.

Christmas Wooly Lamb Ornament by Sew Maris

2. Place the face on one end of the body. Don’t worry about exact placement; just get it pretty close to one end. Using a satin zig-zag stitch (my settings were SW=4.0 and SL= 1.0) and gold metallic thread, embroider 2 eyes on the felt face. If the eyes don’t line up exactly or are not the identical size, have a glass of wine and proceed to step 3. 😉

Christmas Wooly Lamb Ornament by Sew Maris

3. Arrange the felt legs across the bottom edge, and baste in place about 1/8″ from the edge of the fur. Also add a red ribbon loop at the top edge for hanging, and baste that in place as well.

Christmas Wooly Lamb Ornament by Sew Maris

4. Pin the ear and the hanging loop away from the outside edges so that these 2 items do not accidentally get caught when you stitch around the body. You will leave this pin  in place for the next step, so make sure none of the pin is close to the outer edge either!

Christmas Wooly Lamb Ornament by Sew Maris

5. Place the second lamb body on top of the “decorated” one, and stitch around the outside edge, leaving a hole to add the stuffing. Check to make sure there are no “extra” holes in your stitching; it is easy to get the alignment of the outside edges off when you are stitching on bulky fabric like fake fur. If you do have a hole, just re-stitch over that area connecting with the “good” stitching. 😉

6. Turn the lamb right side out being careful to not get poked with the pin! Remove the pin as soon as you can reach it; this might prevent a puncture wound! 😉

7. Add a bit of stuffing to round out your lamb, and stitch the hole closed by hand. (True Confessions: I often skip this step. Yep. LAZY!)

Christmas Wooly Lamb Ornament by Sew Maris

8. Cut another bit of ribbon and thread a bell on it. Tie an overhand knot and hang it around your lamb so you will hear it when it tries to sneak off.

Wooly Lamb Christmas Ornament by Sew Maris

I hope you enjoyed this quick and fun Christmas ornament project! See how cute he looks against a green tree? start to finish this project takes about 15-20 minutes, so you can make a pile of them to add to packages or give as a little gift or party favor. Be sure to check out the other bloggers on tour!

12 Days of Christmas Holiday Blogger Challenge with sewmccool.com large

Don’t forget to visit all of the bloggers who are creating tutorials for the Sew McCool 12 Days of Christmas challenge! Voting will begin on www.sewmccool.com on December 13 and go through 11:59 p.m. U.S. Eastern time on December 20. The blogger with the most votes will win $100 – just in time for Christmas!

December 1

Ren @ The Inspired Wren * Stephanie @ Swoodson Says * Alicia @ Felt With Love Designs

December 2

Natalie @ Sew Outnumbered *Deby @ So-Sew-Easy * Ajaire @ Call Ajaire

December 3

Amy @ Friends Stitched Together * Maris @ Sew Maris * Gemia @ Phat Quarters

December 4

Amy @ How I Make Stuff * Michelle @ Falafel and the Bee

December 5

Beth @ Beth Jarrett * Jen @ Just Joshin

December 6

Lauren @ Molly and Mama * Krista @ Bee Quilted Beauties

December 7

Vicky @ Vicky Myers Creations * Deb @ Sprouting Jube Jube

December 8

Addie @ Addie K * Michelle @ Not My Tree

December 9

Ula @ Lulu & Celeste * Sara @ Made By Sara * Chelsea @ GYCT Designs

December 10

Nichole @ Bluebird & the Boy * Darcy @ Ginger House Designs * Shelly @ Coral & Co.

December 11

Amy @ Britches ‘n Bloomers * Kelly @ Kelly J Designs

December 12

Maegen @ Mae and K * Jess @ Gracious Threads * Jone @ Knot Sew Normal

Happy sewing,

Maris


Tutorial: How to Make Bias Binding

I love the look of binding, and it is definitely not just for quilts (cuz we all know I don’t quilt!).

Bias Tape Tute by Sew Maris

Making your own binding using cute prints is a snap to do, and the look of homemade binding always trumps both the look and the feel of the purchased product. The method I am going to show you today is useful for making a small amount of binding. If you need yards and yards, it is better to make continuous bias—but that is a tutorial for another day!

I like 100% cotton fabric for most of my binding needs, but any lightweight fabric that presses well will work. For most of my needs I like a finished binding width of 1/2″, which means I start with strips of fabric 2 inches wide, or 4 times whatever I want the the finished width to be.

Supplies needed:

  1. Cotton fabric, a minimum of 1/4 yard
  2. Clover 1 inch wide bias tape maker
  3. Rotary cutter
  4. Self-healing cutting mat
  5. Marking tool of your choice (I love Frixion pens)
  6. Thread
  7. Iron
  8. Sewing machine (duh!!)

How to Make 1/2 Inch (finished) Bias Binding

1.  Draw a line on your fabric at a 45 degree angle to the selvage edge, and then cut on this marked line. This 45 degree line is called the true bias.

Bias Tape Tute by Sew Maris

2.  Next, cut 2 inch wide strips from the bias edge.

Bias Tape Tute by Sew Maris
3.  Right sides together, lay 1 bias strip on top of another, and draw a line at a 45 degree angle and pin. Make sure that the direction of the line will create a long continuous strip.
4.  Continue in the same manner, adding as many strips as you need to create the amount of binding you want.

Bias Tape Tute by Sew Maris
5.  Arrange several (or all!)  “pinned junctions” on top of your sewing machine, and sew in a continuous path.

Bias Tape Tute by Sew Maris
6.  Cut the stitching apart, and trim the seam allowances to 1/4 inch.
7.  Press the seam allowances open.

Bias Tape Tute by Sew Maris

8.  Insert one end of the bias fabric strip into the Clover bias tape maker tool. You might need a wooden skewer or pin to help get the fabric moving through the tape maker.

Bias Tape Tute by Sew Maris
9. As the bias tape comes out of the narrow end of the tape maker tool, press with your iron.

Bias Tape Tute by Sew Maris

9.  Press again in half, slightly favoring one side.

You just made your very own bias tape. Congrats!

Happy sewing!

Maris

Tutorial: How to Draft a 1-Piece Collar

A 1-piece collar, you say? Why in the world would I want to make/use one of those crazy-looking things?

How to Draft a 1-Piece Collar by Sew Maris

The first few shirts I made for my husband I did not use a I-piece collar pattern. What was the point, after all? Well, in time, I realized that eliminating the seam on the front edge of the collar produces a smoother line. And the collar and the front placket is your first impression of a shirt. Uh huh. So make it count, people.

Also, my husband loves a good button-down, and eliminating some of the bulk in the collar point area enabled me to create a better-looking buttonhole.  OK, so far that’s 2 points for a 1-piece collar.

What about the downsides? Well, you have to draft it yourself, usually. I don’t believe I have ever seen a pattern with this piece included. Now, I haven’t seen every pattern produced (my husband would disagree, based on the size of my pattern stash!), but for sure it is not the norm in a shirt pattern.

Because the shape is a little wonky, a 1-piece collar requires a bit more fabric than the more typical upper collar and under collar pattern pieces. It just doesn’t fit easily into the little sections of fabric that are often “reserved” for collars, cuffs, and other fiddly little who-ha’s.

Alright. That’s 2 for, and 2 against; a wash. Let’s talk about how you can draft your own 1-piece collar, and you can decide when/where you want to use it.

How to Draft a 1-Piece Collar by Sew Maris
1.  Trace a new, full size copy of your upper collar pattern piece, and draw the stitching lines on both of the front collar edges.
2.  Trace 2 copies of the under collar pattern piece, and draw the stitching lines on both of the collar front edges.

How to Draft a 1-Piece Collar by Sew Maris

3.  Lay the under collar pieces on top of the upper collar piece, aligning the stitching lines. Make sure that the collar point end of the under collar is attached tot eh collar point end of the upper collar. Tape to secure.
4.  Trim da “wings”. 🙂

How to Draft a 1-Piece Collar by Sew Maris

In the image above, the collar pattern is folded on the front edges, and you are looking at  the under collar folded on top of the upper collar. You can see the overlap of the under collar pieces at the center back, right? Of course those 2 pieces are seamed during construction, but this shows you how the weird flying bird-shaped pattern piece actually looks like a collar when it is sewn.

That’s pretty much all there is to it.  Actually, really simple pattern drafting, right?

One more thing. I like to shave a bit off the collar edge (closest to the bottom in this image) and the center back of the under collar only. Why? Because the under collar is on the bias and will “grow” a bit. Since I want the under collar to actually be under the upper collar, it helps to reduce the dimensions of this pattern piece slightly. Only logical, right?

Oh, I guess there is another thing. It will save you time if you also draft a separate interfacing pattern piece for this collar. I like the interfacing pattern piece to cover only the upper collar section, and not extend onto the under collar at the fold. Less bulk which keeps that front edge fold smooth and perfect. Again, only logical.

For another tutorial on this subject (and a glimpse of my cute DH!), you can check out my Craftsy post on How to Make a One-Piece Shirt Collar.

Or, if you prefer, you can watch a quick, little video I made to demo this process.


Have you ever drafted/sewn a 1-piece collar? What did you like about using a single collar piece compared to a separate under and upper collar piece?

Happy sewing!

Maris


Tutorial: How to Hem Jeans (and Stop Paying For Hemming Alterations)

If you own a decent sewing machine, all you need to do is buy a couple of inexpensive tools and you will be all set to hem your own jeans and casual pants. As a matter of fact, you could quickly start charging your friends to do their hemming alterations!

Video Tutorial: How to Hem Jeans by Sew MAris

Here are the tools/supplies you will need:

  1. Size 100 Jeans needle
  2. Jean-a-majig
  3. Denim or topstitching thread to match the garment
  4. Scissors
  5. Sewing machine

Watch this video to learn just how easy it is to properly hem a pair of jeans. You’ve got this, peeps!!


Happy sewing!

Maris

Tutorial: How to Sew a Blind Hem

You love to sew, but maybe you are a little low on time to create the kind of garments you can be proud to wear. Or maybe all you need is a clear explanation and a simple, clear demonstration of the technique you have been itching to try.

Let’s start with the way ready-to-wear garments are hemmed in manufacturing. Duh! By using an invisible or blind hem on a sewing machine, that’s how. There is no time for hand hemming in a manufacturing process.

Video Tutorial: How to Blind Hem by Machine by Sew Maris


Soooo, if you  are not exactly sure how large your hem depth should be, or the proper amount of hem turn back, or how to orient your fabric under the sewing machine, this video will give you the answers you need. Give this technique a try! All you need is a blind hem stitch and a blind hem foot for your sewing machine. Oh. And a garment that needs to be hemmed.


There, that wasn’t so hard, was it? Now get out there and hem like a pro! (Psssst! Practice helps tremendously, btw. ;-))

Happy sewing!

Maris

Next Page »

Primary Sidebar

Archives

  • Facebook
  • RSS
  • Twitter

Copyright © 2023 Sew Maris on the Foodie Pro Theme