
Ever since our trip to Belgium and France last fall I have been obsessed with pleats. Maybe it was the Belgian waffles – they look sort of “pleated”, right? Maybe is was the DEE-VINE pleated pockets I saw on a linen jacket at Mokuba in Paris. Maybe it was the ADORABLE pleats I saw walking down a street in Rouen on a little girl’s coat. Although I can’t trace the source, I am seriously smitten with pleats.
I used to smock dresses (and hence, pleat fabric) when my youngest DD was a babe and very young girl. Yes, she did look like she stepped off the cover of Sew Beautiful, and luckily both of us enjoyed that period of her life. The tool I used to create the pleats at that time was, aptly named, a smocking pleater  (see above…on the right). If you have never used one of these, they are marvelous tools for creating eensy weensy little pleats along a length of fabric. Â
But if you are going for pleats larger than 1/16 of an inch, the smocking pleater is not the ticket. I’ve wanted a”Perfect Pleater” for a long time, and given my current obsession, I decide to succumb and order one from Clothilde. Tools are investments, right? (At least that’s what my husband says when he orders a $700 saw for a $50 project. <snicker>) I was making a white blouse for a shirt class I was enrolled in, and adding pleated cuffs seemed a great way to personalize my design. The fabric I used for the blouse and pleating was a gorgeous white-on-white stripe, 100% cotton from Mood Fabrics in New York. Yummy. After cutting out the blouse, I used the leftover fabric for my pleating mania. I seamed the strips, and serged one edge with a rolled hem, and got to pleating. Get the idea?
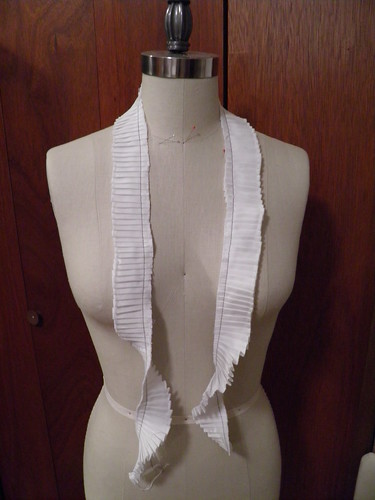
After all the work to create the pleats,and yes is WAS a lot of work, I was most worried about whether laundering the shirt would cause those precise little soldiers lined up so neatly to disintegrate into strips of white froth with a rolled edge. A little research indicated that a 1:8 solution of white vinegar to water would permanently set the pleats. Really? That seemed almost too easy, but I had no other alternative, so I dutifully made up said solution and applied it with a press cloth to the pleats. After the first laundering, before ironing, here is the result. What do you think? I am thrilled! I think I might add “pleater extraordinaire” to my business cards now!Â

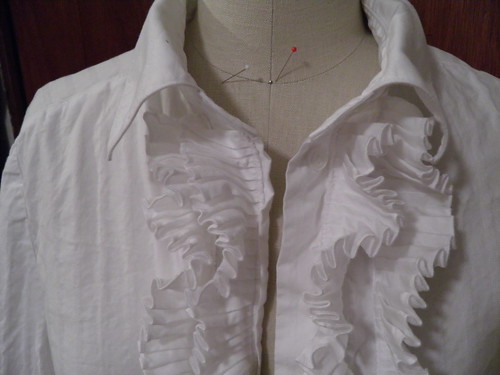
Here is a close-up of the front, so you can see that the pleat press marks are still totally visible and crisp. And of course after a good pressing they will be the little white soldiers they were meant to be.      Â
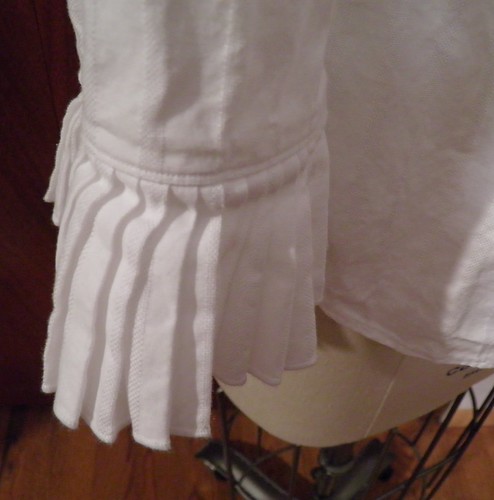
And here is the cuff, an even greater width of fabric that also held up perfectly after washing. Sweeeeeeet!
I know it would be nice if I showed you a picture of the freshly ironed blouse, but today is not my ironing day. Happy sewing!
Maris Olsen