Today you are going to remove the pleat from the Front pattern piece, cut out your culottes, and complete the basic construction up to installing the zipper. Sound like a lot? Really, it is no more than a couple of hours of work. I promise!
(Psst! You did run your fabric thru a wash/dryer cycle, right?)

If you have never adjusted a pattern before, this kind of change is about as simple as it gets, so no worries. And when you are done you have “I adjust my patterns” bragging rights. 😉
To remove the front pleat option:
- Fold the Emily Front (#3) pattern piece along the blue, dashed pleat line that is farthest from the center front.
- Bring this folded line to the pleat line closest to the center front, making sure both lines meet up exactly.
- Tape to secure. Use a temporary stick tape (blue painter’s tape is easy and cheap) if you plan to make a pair with pleats someday, or cellophane tape if you will never use the pleat option.
Bam! That’s done.
This is also a good time to decide if you want to make your culottes longer or shorter than they are drafted. All sizes are 22 1/2 inches long, so you can measure a skirt or hold a tape measure against your front to decide if you need more or less length. My first pair were a smidge short, so I added 3/4 of an inch to both the Front (#3) and the Back (#4) pattern piece. If you have never done this kind of adjustment before, please read this blog post about pattern adjustments. It refers to changes for a shirt pattern – but the concepts apply to all patterns.
Cutting out an unlined version of Emily culottes is fast and east. That’s good because cutting out is not my favorite part.;-) You only need four pattern pieces; Front Yoke (#1), Back Yoke (#2), Front (#3), and Back (#4).
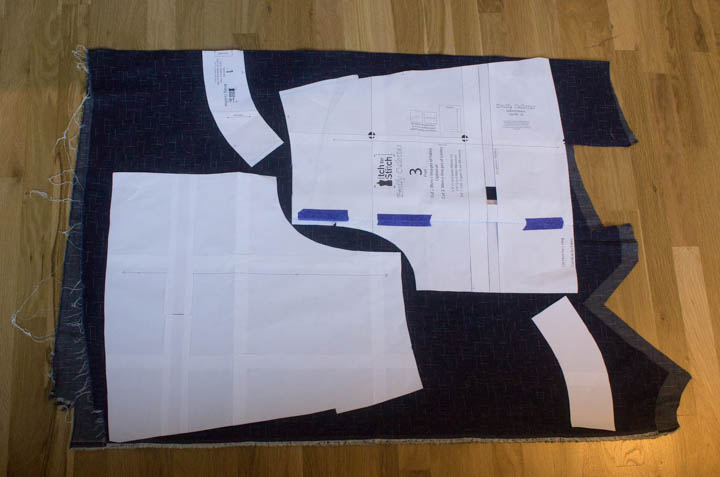
See my blue painter’s tape where I folded out the pleat on the Front? Also the extra length inserted? I was able to cut this pattern out of a leftover remnant of denim from a jacket I made a few years ago. I had to squeeze a bit, but I got it out. One pair of Fronts, one pair of Backs, 2 Front Yokes on the fold, and 2 sets (4 total) of Back Yokes. Also, you will need to interface the yokes, so be sure to cut one Front Yoke and a pair of Back Yokes from medium interfacing.
Now, Kennis shows you a very couture interfacing technique (starting on page 13, instructions 1 – 8), taught by people like Marla Kazell and other fancy-pants sewing teachers. It works very nicely, and provides a lovely finished lower edge to the interfacing. BUT. It only makes sense if you are planning on following her directions to use the interfaced yokes on the inside, which I do not do on my waistbands/yokes.
So why did I get all rebellious and ignore her instructions? Because I have another RTW technique that I like to use on waistbands, so I just fused my interfacing “per usual” to 1 Front Yoke and a pair of Back Yokes. Your call. Either follow Kennis’ directions, or wait for it……all shall be revealed. 😉
I also skipped the Front Patch pockets because I don’t need any extra fluff in my front, and decided to try out the welt pocket in the linen-blend version. Your call—add ’em if you like. I do kind of miss having a pocket in these, so if I can find a scrap of leftover fabric I might try a jeans style pocket on the back.
So if you are skipping the finished edge interfacing technique, the Patch pockets with Buttons, and the Welt Pockets, jump all the way to instruction 48 on page 19. We are ready to sew! If you have ever made a pair of pajama pants, these instructions should look very familiar.
Do keep in mind that this pattern is drafted with a 3/8 inch seam allowance. 🙂
- Right sides together, sew the inseam of 1 Front and 1 Back.
- Repeat step 1 for the second side.
- Press both seams open, and finish as desired (I serged).
- Right sides together, sew the crotch curve, aligning all edges, notches, and the inseam.
Note: I did not press the crotch curve open as suggested. Instead I just serged the curved seam and pressed to one side, because, well, that is just how I always do it. That curve is not really going to press open very well without clipping/weakening the seam, so if you have a serger this is a good use for it. If not, I would stitch with a straight stitch, trim to about 1/4 inch, and then overcast or zig-zag the 2 edges together. My 2 cents.
Now skip to step 52, since we are making the plain front version.
- Right sides together, stitch the Front Yoke to the Front.
- Right sides together, stitch the two Back Yokes together, and then stitch to the Back right sides together.
Note: I deviated from Kennis’ instructions here too. She applies the non-interfaced yokes to the Front and Back. I like the interfaced side to be the public side of my waistbands/yokes, because I don’t want this part of my garment to “crumple” when wearing. And now you can see why I didn’t bother with the interfaced edge finish in steps 1-8; there is no value because the interfaced bottom edges of the yokes are stitched to the body of the garment. Like many things in sewing, neither method is right or wrong—just personal preference.
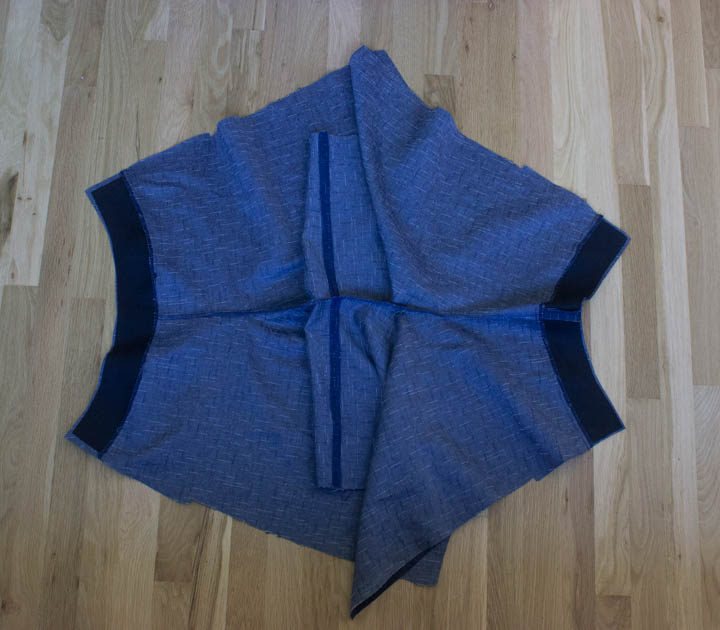
This image shows all the completed seams. The inseam is the vertical line right in the middle, the crotch curve is the horizontal seam in the center that is serged only, and the interfaced yokes are attached to the Front (left side of the image) and Back (right side). I think this was about 15-20 minutes max of stitching.
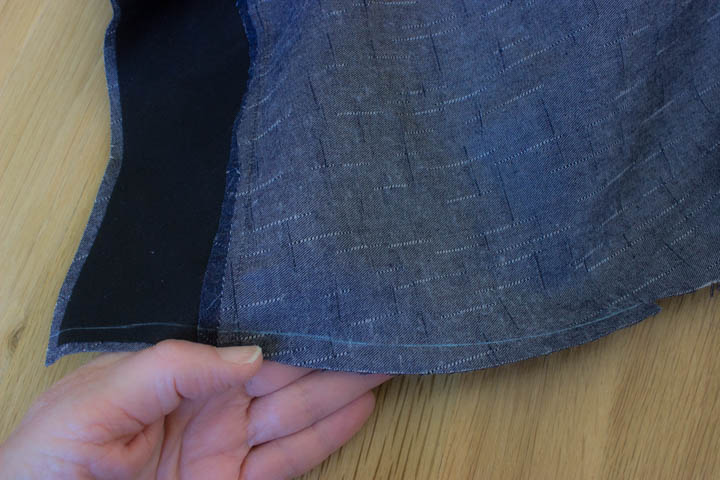
Instruction 55 has you trim off the “extra” zipper seam allowance on the right side only of both the Front and Back the culottes, since the zipper is on the left side. I like to draw a chalk line 3/8 from the raw edge so my cutting is accurate all the way along that curved seam.
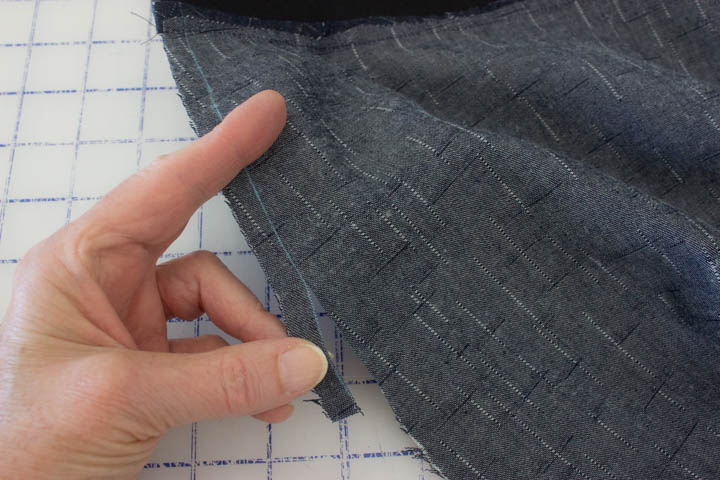
Double check you are working on the right side of the culottes! And then go ahead and trim. 🙂
Next up, inserting an invisible zipper. Which is the easiest, fastest zipper to install, IMHO.
We covered a lot of different steps today, but it just doesn’t take that long to cut out 4 pattern pieces, slap a little interfacing on two of them, and stitch up a couple of seams. I want to see you wearing these culottes, so get going, ladies! 😉
Happy sewing!
Maris