Don’t you just love the clarity in today’s pattern instructions? One of my favorite instructional sentences found in many patterns today is “Finish seam.” Wow. How do you begin to follow THAT? What does “finish”mean? Are there different kinds of seam finishes? When do you choose one over another? What is the purpose of a seam finish? Do you ALWAYS finish seams? This kind of useless information makes my blood boil. A beginning sewist reads this sentence and just wants to cry.
So let’s break this down. For starters, the purpose of “finishing” a seam is to prevent raveling and (possibly) to provide additional stability. The type of seam finish you want depends on (minimally) these factors:
- fabric fiber content
- fabric raveling characteristics
- planned method of laundering the finished garment
- planned pressing direction of the seam (for example, open, or to one side)
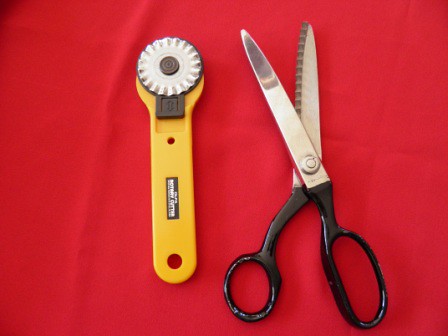
In addition, some seam finishes require special tools, such as pinking shears. You might WANT to pink your seams, but if you don’t own pinking shears or a rotary cutter with a wavy blade there is no point in choosing this finish method. And despite the pattern instructions, yes, there are times when no seam finish is necessary. An example is a lined coat. Since the lining completely covers and protects the jacket seams from wear or laundering abrasion, there is no requirement to finish those seams. You may choose to, but chances are pretty good it is not necessary.
Now that we know why we should even bother to finish our seams, let’s examine three seam finish options in more detail. This is not the comprehensive list of all seam finishes, but includes a few basic ones. More to come in future tutorials! Also, please note the instructions below all assume that you have already stitched the seam. Duh. 😉
1. Pinking
- Suitable fabrics: firmly woven cottons, linens, polyesters, blends
- Unsuitable fabrics: extremely ravelly fabrics of any fiber composition
- Suitable seams: any seam that is designed to be pressed OPEN
- Special tools: Pinking shears or fluted blade for a rotary cutter
- Preferred seam allowance: 5/8″ or greater
- Advantages: does not add any bulk to the SA, fast, easy
- Disadvantages: requires a special tool
Pinking procedure
Using pinking shears or rotary cutter, trim a minimal amount of fabric from the raw edge. Press the seam open. Easy peasy!!
Pinking tools:
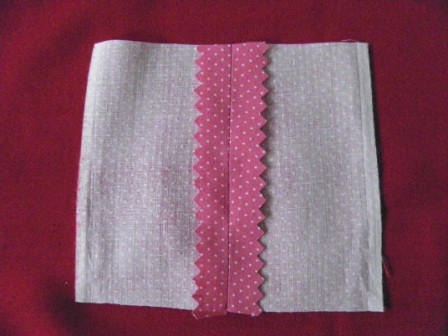
Pinked seam allowance:
2. Narrow “hemming” seam allowances
- Suitable fabrics: firmly woven cottons, linens, polyesters, blends
- Unsuitable fabrics: extremely ravelly fabrics of any fiber composition
- Suitable seams: any seam that is designed to be pressed OPEN, and is straight (or mostly straight)
- Special tools: None
- Preferred seam allowance: 5/8″ or greater
- Advantages: no special tools, only requires a straight stitch
- Disadvantages: a little time-consuming (three stitchings per seam)
Narrow “hemming” seam allowances procedure
Using a normal length straight stitch (usually 2.5 or 10-12 stitches per inch), turn the right side edge of one side of the seam allowance to the wrong side 1/8 inch or so, and stitch. Repeat for the other side of the seam allowance. Press the seam allowance open. Easy peasy!!
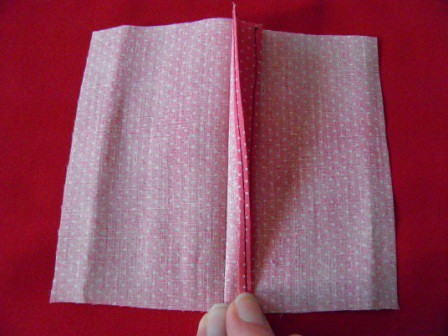
Narrow hemmed seam allowance – front side of seam allowance view

Narrow hemmed seam allowance – underside of seam allowance view:
3. Overcasting/Zig-zagging (is that a word? lol) seam allowances
- Suitable fabrics: firmly woven or semi-firmly cottons, linens, polyesters, wools, blends
- Unsuitable fabrics: sheer or extremely lightweight fabrics
- Suitable seams: any seam that is designed to be pressed open or to one side
- Special tools: Overcast foot (if overcasting)
- Preferred seam allowance: 5/8″ or greater
- Advantages: works well for ravelly fabrics, does not require special tools (possibly exception an overcast foot)
- Disadvantages: can create a little “ridge” of fabric under the zig-zag stitch that adds bulk and can show thru to the right side after pressing; overcasting requires a special foot for your sewing machine
Overcast/Zig-zag seam allowances procedure
If zig-zagging, set your machine for a fairly wide stitch (at least 3.5), and a medium length (something between 2-3). You can zig-zag each seam allowance separately, or if you want to press the SA to one side you can zig-zag the SA together. If you are overcasting, change to the overcast foot, and check your machine manual to set up the overcast stitch. Just like the zig-zag finish, you can apply this to either each SA or both of them together. Press the seam allowance open or to one side.
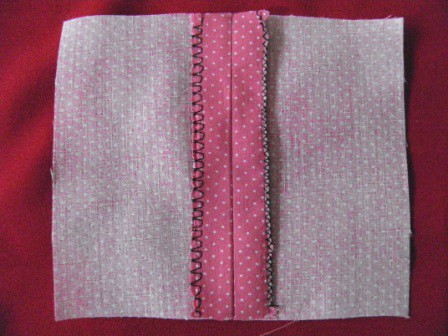
Overcast (left edge) and zig-zag (right edge) “open” seam allowance finish:
Hope this helps de-mystify the term “finish” a little – more to come!
Happy sewing
Maris Olsen